Sunday, March 15, 2015

Baby bibs tutorial

Well, about this time last year I found out I was going to be a godmother. Obviously I was over the moon when I received the news, and I still feel the same right now. I totally adore my goddaughter! Can't get enough of her little smile, and she's the perfect excuse to start sewing adorable baby-thingies :).

I started looking on the internet on what I could make for her that didn't look too difficult. So one of the first things i stumbled upon were baby-bibs. There are so many tutorials on Pinterest and all of them looked pretty do-able.

So I combined some of them to make my own 'How to sew a baby-bib tutorial'. Since trying the project, I've made three of them already and I get better and faster at it every time. I think this one took me about 40 min. Pretty good eh :). Since I've already given the other two to my sister, I can only show you the one I've made today. However, I will try to get a photo of the other ones to show you guys the result (Yes, I'm pretty happy with the way they turned out as you can tell ;) ).

So let's start the tutorial:


 Materials I used:

Cotton fabric (snails)
Baby towel (pink)
Fabric scissors
Matching thread
Pattern (I will add one later, but don't have a scanner at home so it will have to wait a bit)

Step One:
Cut out the pattern piece, choose matching fabrics. I've chosen to use a baby towel because it absorbs all moisture pretty well (and we all know that can come in handy with babies :) ), but I've also done one with cotton on the front and back and it works pretty well.

Step Two:
Fold your fabrics and place the pattern piece with the middle side on the fold. Trace the pattern on your fabrics. (From experience I can tell you to make the neck-pieces long enough, the first one I made was a bit tight so better make it al little long than the other way around).
Trace your pattern, make sure the middle part is placed on the fold.
 
After you cut it out, it should look like this, don't worry if the sides aren't even it'll get fixed when you start sewing.
 
Do the same with your second piece of fabric.

Now you should have two pieces of fabric.
Step Three:
Can you tell the difference?.....
I've ironed the fabrics really fast so it's a bit easier to line them up.
Put the two fabric pieces on top of each other with the good sides facing each other. Pin them in place at some important points (neck ties, bottom,...).
They don't fit perfectly together, but you turn it inside out after sewing, so don't worry about it!

Pin to make sewing easier.
 Step Four:
Time to start sewing!
I chose a pink thread to sew the bib together. First place your fabric and choose the seam allowance you like. I like it when the outside of the fabric corresponds with the outside of the sewing foot (is that the right term?), it makes it easy to keep the same distance.

Line up the fabric with your machine and start sewing!

Step Five:
Sew all the way around the bib, leaving about 4 cm (1.5inch?) open so you can turn your bib inside out.

Step Six:
After turning it inside out, I've quickly ironed it again. Now to finish off, sew along the side of the bib again, starting with the gap you left to turn your fabric. this time, sew closer to the edge so the gap will be sewed closed automatically ( I like using the inside of the foor as a guiding distance this time).
Still looks a wit wobbly, but it gets better when you topstitch it.

This time, use a smaller seam allowance.

Step Seven:
Tadaa!! You did it! That wasn't that difficult at all was it? It's really a beginners project, but I still love doing them because they don't take a lot of time (really addicting) and I bought some cute fabrics that look way nicer than the boring bibs you can buy in the store (the cute ones cost waaaaaay to much in my opinion :) ).

Step Eight:
Last thing to do of course is to add a closing mechanism. The first bib I made I used Velcro and it works really well, but a couple of weeks ago I purchased a button puncher and since I bought some colorful snaps I thought these wouls look nicer. And... it's pretty easy too ;).
Found some matching pink snaps.

You can see some sides are still a bit wonky :).
Finished!
Doesn't it look adorable? She can dribble and look cute at the same time, perfect!

Done!
And another one...

Well, all I've got left is a quick question for you guys. In a few weeks I'm goint to participate in a jumble sale that is organised by my community once a year. I was just wondering if I would try to sell some of them... So my question to you is would you buy these if you saw them? And how much would you be willing to spend?

Thanks!

Remember to let me know if you've seen Pins I could try out!


Friday, March 6, 2015

DIY storage : First project pre-blog

Before I had the idea to start a blog about me taking on interesting pins, I've already tried some of them out. It's a shame that I didn't think to take picture of the before and after process while I was doing them, but I wanted to share my experience with them anyway.

When cleaning out the attic at my parent's home I stumbled across an old filing cabinet my mother used (before there were things like computers to store important information on ;) ). As I do not have a before picture I tried to find one on the internet. It kind of looked like this (but a lot smaller of course):
So when I found this pin (filing), I just had to try it out. To find the step by step guide you can follow the link I added. Doesn't it just look adorable!

What the Pin looked like:
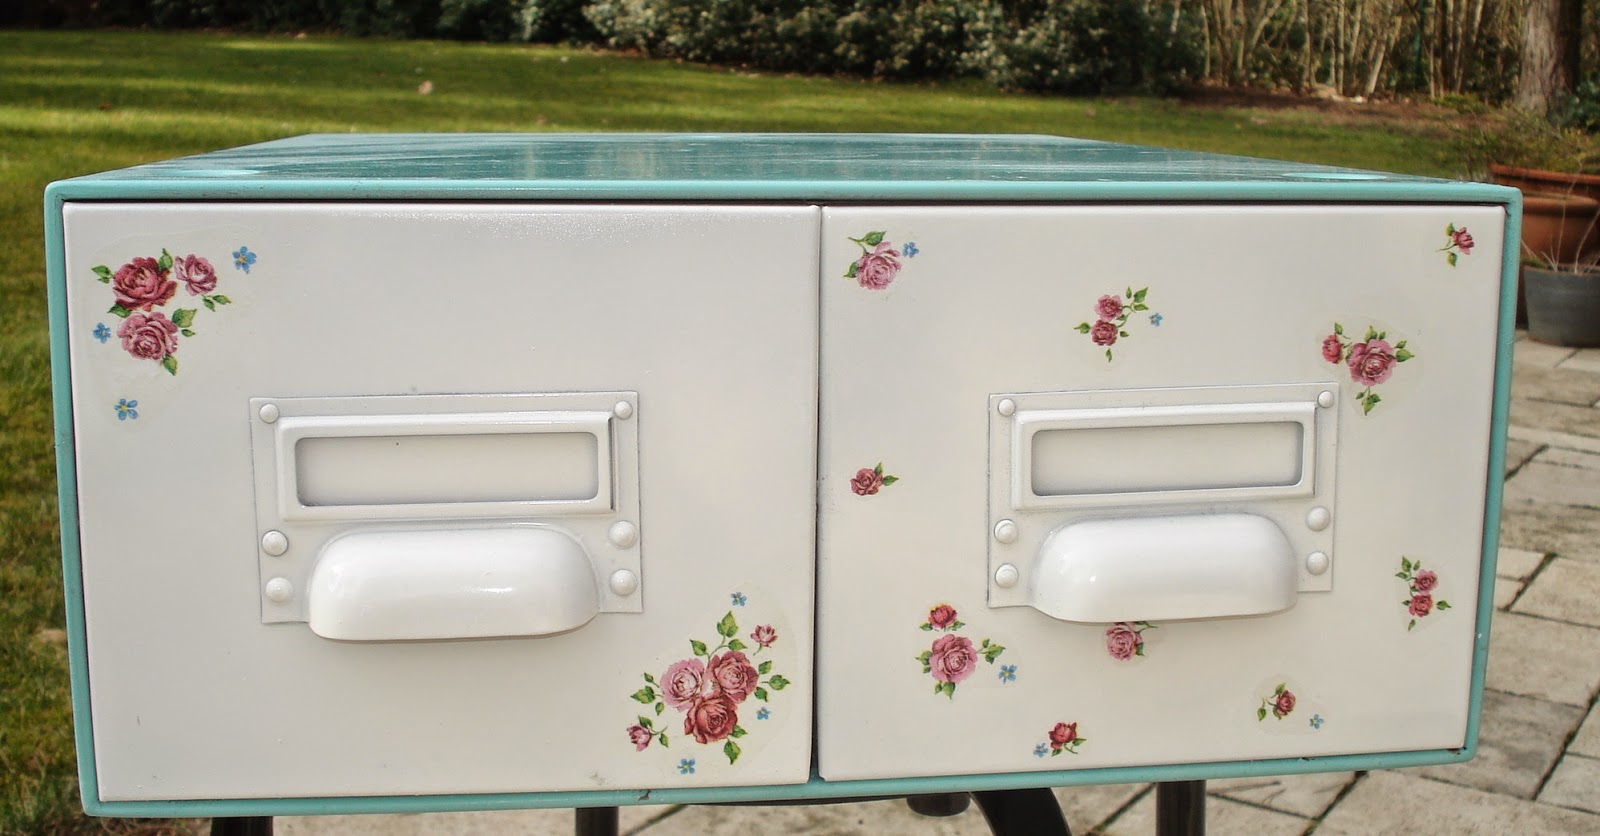
Well, since it was more of a 'let's see if I can do this' project I must confess I took some shortcuts. I ended up just cleaning the cabinet with some soap and spraying it with some paint. Later I added some decoration by cutting up napkins and using decoupage glue to fix the flowers onto the cabinet. I must admit this project didn't take me very long (I did about 3 coats of paint and let it dry for at least one hour in between the coats) and it was very do-able. While applying the first coat I was scared the paint wouldt be sprayed on evenly (you could see distinctive differences after the first coat), but it evened out when adding more coats.
You can see my final result here:

I couldn't decide on the placement of the flowers so opted to do 2 different patterns.

Since my walls are yellow I decided on a blue-green pastel color, I just fell in love with it in the store.

I must say it turned out pretty nice, and I'm somewhat regretting not taking the project a bit more seriously and spending some money on a base coat. Since the base of the cabinet already had some rust on it, the paint is not staying to that part very well. However the chipping is not visible from the top, so it looks really nice in my room and I've been using it to stash my fabric.

Perfect to stash all my little fabric pieces!

Let me know what you think!
If you have any nice projects you think I should try out, I would love to hear them.

Xx


The beginning...

First... let me give a short introduction as to who I am. My name is Lotte, I'm a teacher and love all things involved in decorating and sewing. I have to confess that I'm a sewing newbie. Since I've bought my sewing machine on a whim this summer I have been loving it! Although I'm not that experienced and have never taken classes I have to say that Pinterest has been my guidebook to finding and trying out ideas and they turned out alright if I say so myself.

I have always considered myself an ok crafter, but since I've discovered Pinterest I'm not so sure anymore... I don't know if you feel the same but there are so many things on Pinterest that look totally do-able and really nice, until you start the project. However, since I'm actively searching to buy my first home I've decided to take on the challenge to find nice decorating/sewing ideas and try them out. 

On this blog I'm planning to give you a sneek peek of the projects I'm attempting to recreate. I will give you a step by step guide as to how the proces of decorating the new house is going and how succesful I can copy those beautiful pins. If I can do it, I'm sure so can you!

Wish me luck!